Hi Stampers,
Just a quick note to let you know I'm thinking of you today!
This is a 2 x 2" notecard, Crumbcake and Whisper White card stock, Pool Party Bakers twine, stamped with Jet Black Stazon ink and watercolered with aquapainters, Pool Party, So Safron, Certainly Celery, and Crumb Cake ink.
Oh yes, the stamp set is the new Storybook Friends!
Thanks for stopping by!
Showing posts with label Aqua Painter. Show all posts
Monday, July 2, 2012
Thursday, June 28, 2012
Hooray! Another Color Challenge!
Hello Stampers!
I'm joining another color challenge over at Create with Connie and Mary (ccmc208) with
colors I rarely use:
They look so cute together with the little suns don't they? Well, I didn't make little suns but I did pull out one of my new sets for this challenge:
Just seeing the little images from Storybook Friends stamp set brings me back to when my girls were little. We are all voracious readers and they started from a very young age- maybe from all the books I read to them. Read to your children! It's fun!
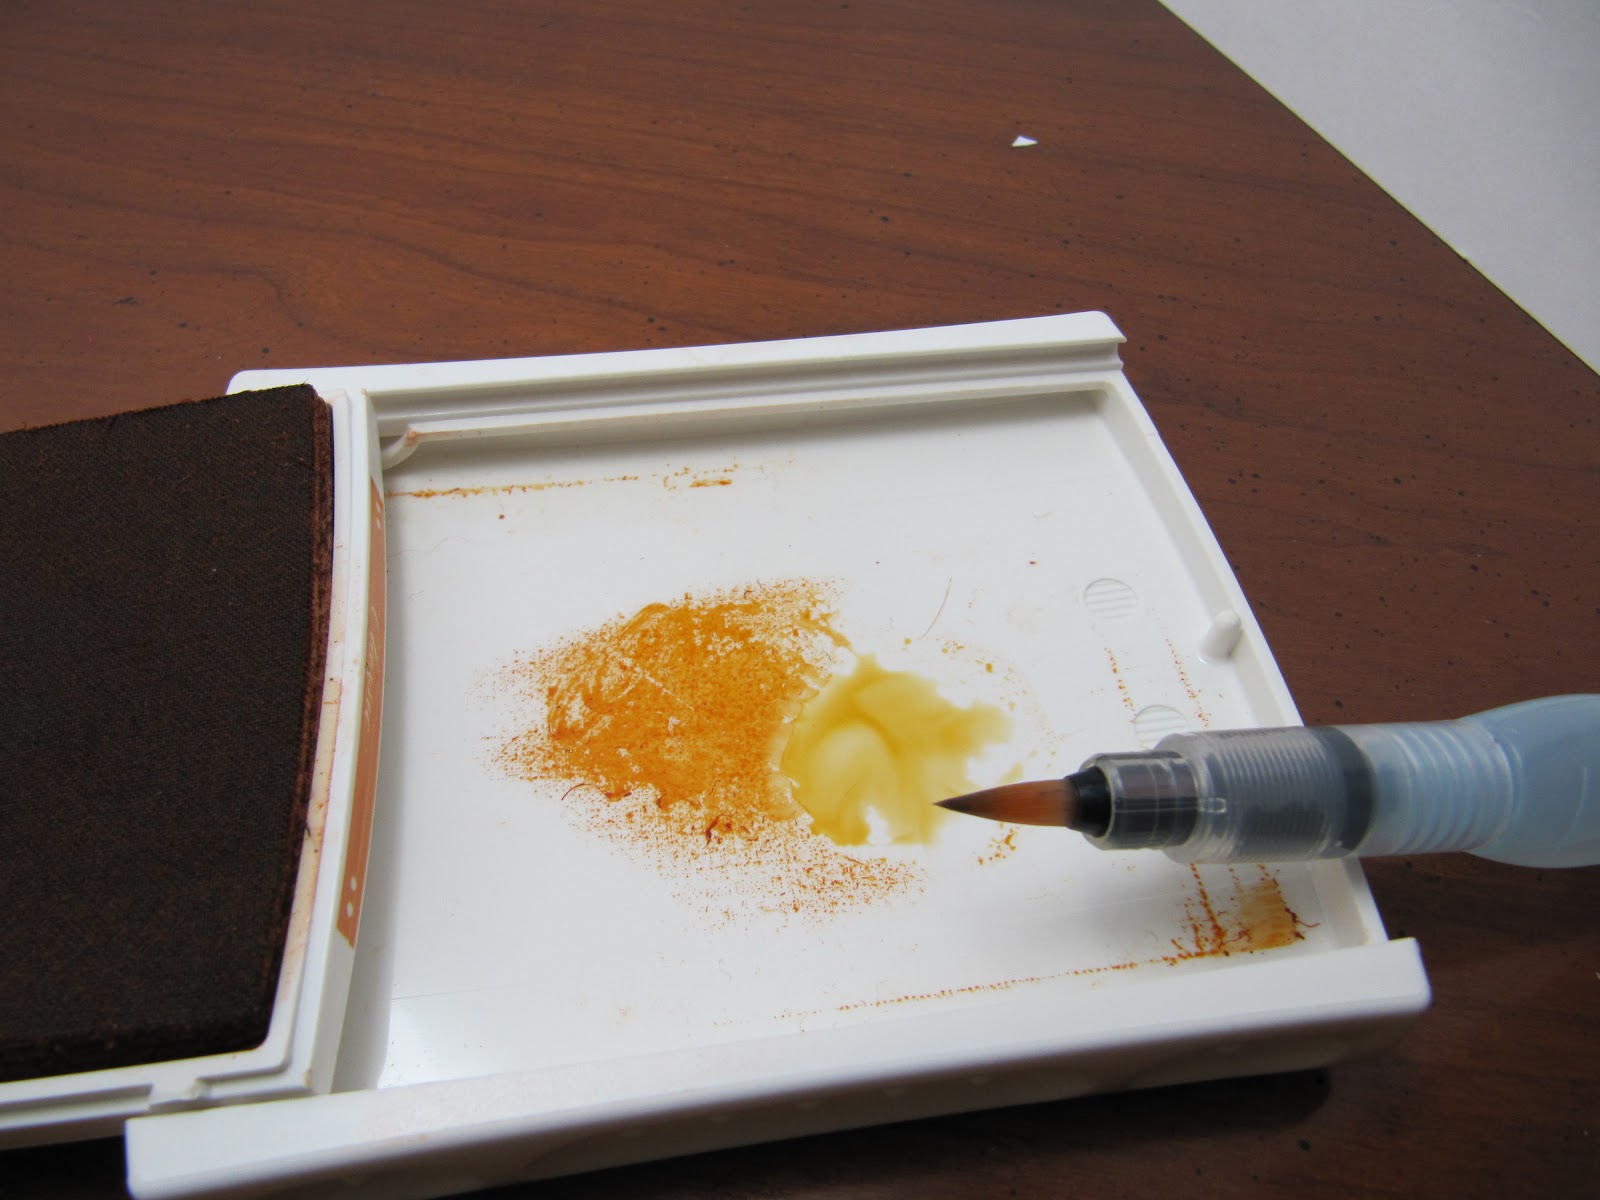
I stamped the fox with my Jet Black Stazon Pad (#101406) and colored in with my Aquapainters (#103954) and my ink pads (Pumpkin Pie, Real Red, Old Olive, and Bashful Blue), and cut out with the Labels collection Framelit. Have you water colored with your stamp pads before? If you haven't all you need to do is squish your pad before you open them to get ink on the lid of the pad. You can then pick up this ink with your aquapainter, watercolor paint brush, or blender pen to happily color away! Just a tip- when painting a larger area, like the fox, get the ink really wet so it spreads evenly. You can add more color over the top as you need it but you'll have better coverage to start. Let me show you what I mean:
Here is the lid with the ink squished on the top. On the left is how it looks when you open up the case. On the right I've mixed the ink with the water in my aquapainter to make a "wash". When I paint on my first coat it looks like this:
It is a light, even coat. I can then add more color and detailing as I like:
I'm not really very talented at water-coloring but I really don't have to be- the images are so cute they stand up on their own!
Okay, so I used Basic Gray for the background card stock, and Pumpkin Pie for the belly band, after embossing it with the new Argyle Embossing folder. I made a banner in Real Red cardstock and embellished it with a Basic Grey button (using the Button, button Sizzlit die).
I guess the last thing I should tell you about is omitting. The Hooray actually is part of the stamp with the fox. To stamp the fox with out the words I carefully applied the pad to the stamp without getting the ink on the words. I then cleaned the stamp carefully, let it dry, then inked up the words with the Black Stampin' marker and stamped just the words on the Real Red cardstock.
Thanks for stopping by!
Shop 24/7 by clicking Here
I'm joining another color challenge over at Create with Connie and Mary (ccmc208) with
colors I rarely use:
They look so cute together with the little suns don't they? Well, I didn't make little suns but I did pull out one of my new sets for this challenge:
Just seeing the little images from Storybook Friends stamp set brings me back to when my girls were little. We are all voracious readers and they started from a very young age- maybe from all the books I read to them. Read to your children! It's fun!
I stamped the fox with my Jet Black Stazon Pad (#101406) and colored in with my Aquapainters (#103954) and my ink pads (Pumpkin Pie, Real Red, Old Olive, and Bashful Blue), and cut out with the Labels collection Framelit. Have you water colored with your stamp pads before? If you haven't all you need to do is squish your pad before you open them to get ink on the lid of the pad. You can then pick up this ink with your aquapainter, watercolor paint brush, or blender pen to happily color away! Just a tip- when painting a larger area, like the fox, get the ink really wet so it spreads evenly. You can add more color over the top as you need it but you'll have better coverage to start. Let me show you what I mean:
Here is the lid with the ink squished on the top. On the left is how it looks when you open up the case. On the right I've mixed the ink with the water in my aquapainter to make a "wash". When I paint on my first coat it looks like this:
It is a light, even coat. I can then add more color and detailing as I like:
I'm not really very talented at water-coloring but I really don't have to be- the images are so cute they stand up on their own!
Okay, so I used Basic Gray for the background card stock, and Pumpkin Pie for the belly band, after embossing it with the new Argyle Embossing folder. I made a banner in Real Red cardstock and embellished it with a Basic Grey button (using the Button, button Sizzlit die).
I guess the last thing I should tell you about is omitting. The Hooray actually is part of the stamp with the fox. To stamp the fox with out the words I carefully applied the pad to the stamp without getting the ink on the words. I then cleaned the stamp carefully, let it dry, then inked up the words with the Black Stampin' marker and stamped just the words on the Real Red cardstock.
Thanks for stopping by!
Shop 24/7 by clicking Here
Thursday, June 14, 2012
More Papaya Collage
Hi Stampers!
I'm finding it hard to be inside stamping when the sun is out shining and the garden is calling! I did stamp up a quick card for you last night to show you the versatility of the Papaya Collage stamp set. I've had toile on my brain lately- I'm thinking of recovering my favorite chair in black and white toile, and Papaya collage fits this motif quite well. Let me show you:
This black and white scheme uses just that- Basic Black and Whisper white. I watercolored the rose using the new Rasperry and Gumball green incolor pads with my trusty aquapainters, cut it out, added another leaf, and mounted it with dimensionals. Could you imagine life without dimensionals?
Thanks for stopping by!
Shop 24/7 by clicking here!
I'm finding it hard to be inside stamping when the sun is out shining and the garden is calling! I did stamp up a quick card for you last night to show you the versatility of the Papaya Collage stamp set. I've had toile on my brain lately- I'm thinking of recovering my favorite chair in black and white toile, and Papaya collage fits this motif quite well. Let me show you:
This black and white scheme uses just that- Basic Black and Whisper white. I watercolored the rose using the new Rasperry and Gumball green incolor pads with my trusty aquapainters, cut it out, added another leaf, and mounted it with dimensionals. Could you imagine life without dimensionals?
Thanks for stopping by!
Shop 24/7 by clicking here!
Tuesday, May 8, 2012
Mother's day gift card holder
Hi Stampers!
I made this gift card holder that can be used for any of the many occasions happening this month- graduation, Mother's day, one of the million birthdays, teacher appreciation, you name it. Here is the photo and then I will tell you about it-
Oh, I guess I should show you the inside as well!
Isn't this sweet? I wanted to use up some of the retiring DSP and the retiring stamp sets before they go away at the end of the month. Please check the retiring lists HERE so you don't get caught unawares! The last day of May is the last day of the current catalog! It is retiring a month early this year to make way for a new catalog cycle, and I'm so excited about the new catalog! Do you want to get it for free? Just order from me before the end of the month and I will send you the new catalog! It's that easy. Just go HERE to place an order!
About this project: I used the Beyond the Garden DSP and let the colors dictate the palette. Pacific Point is the main color and I may have cheated by using Pear Pizazz instead of Wild Wasabi for the green. To watercolor the flower from Growing Green I first stamped it with Pacific Point ink and then bled the ink into the body of the flower with aqua painter (103954). It has such a nice soft effect don't you think?
If you look closely you can see a "stitch line" across the bottom of the DSP. I used my Mat Pack (105826) and Paper Piercing tool (116631) to punch the holes and then drew a line through them with the Uni-ball signo Gel Pen (white 105021) to look like stitches. I will make a tutorial tomorrow so check back! I also used the gel pen to make the white dots on the scallops. This is not just an ordinary Gel Pen. I have had it for a few years now, it hasn't dried up and it leaves a nice color on the dark card stock- I highly recommend this pen!
Thanks for stopping by!
Shop 24/7 by clicking Here!
I made this gift card holder that can be used for any of the many occasions happening this month- graduation, Mother's day, one of the million birthdays, teacher appreciation, you name it. Here is the photo and then I will tell you about it-
Oh, I guess I should show you the inside as well!
Isn't this sweet? I wanted to use up some of the retiring DSP and the retiring stamp sets before they go away at the end of the month. Please check the retiring lists HERE so you don't get caught unawares! The last day of May is the last day of the current catalog! It is retiring a month early this year to make way for a new catalog cycle, and I'm so excited about the new catalog! Do you want to get it for free? Just order from me before the end of the month and I will send you the new catalog! It's that easy. Just go HERE to place an order!
About this project: I used the Beyond the Garden DSP and let the colors dictate the palette. Pacific Point is the main color and I may have cheated by using Pear Pizazz instead of Wild Wasabi for the green. To watercolor the flower from Growing Green I first stamped it with Pacific Point ink and then bled the ink into the body of the flower with aqua painter (103954). It has such a nice soft effect don't you think?
If you look closely you can see a "stitch line" across the bottom of the DSP. I used my Mat Pack (105826) and Paper Piercing tool (116631) to punch the holes and then drew a line through them with the Uni-ball signo Gel Pen (white 105021) to look like stitches. I will make a tutorial tomorrow so check back! I also used the gel pen to make the white dots on the scallops. This is not just an ordinary Gel Pen. I have had it for a few years now, it hasn't dried up and it leaves a nice color on the dark card stock- I highly recommend this pen!
Thanks for stopping by!
Shop 24/7 by clicking Here!
Subscribe to:
Posts (Atom)